How to Write a Personal Check: A Step-by-Step Guide
In today's digital age, it's not uncommon to receive a check in the mail or from a cashier's window. However, with the rise of online banking and digital transactions, many people are no longer familiar with the process of writing a personal check. In this article, we'll take a closer look at how to write a personal check, including the various parts of a check and the steps involved in filling it out correctly.Why is it Important to Know How to Write a Check?
While digital transactions have become increasingly popular, there are still times when you may need to write a check. For example, if you're paying a bill or making a purchase in person, a check may be the only acceptable form of payment. Additionally, having a checkbook on hand can be a useful backup in case you need to make a payment quickly.Understanding the Parts of a Check
Before we dive into the steps involved in writing a check, it's essential to understand the various parts of a check. These include: * Date: The top right corner of the check * Payee: The name of the person or business receiving the payment * Amount: The dollar amount of the payment * Memo: A brief description of the payment (optional) * Signature: The signature of the account holderStep-by-Step Guide to Writing a Personal Check
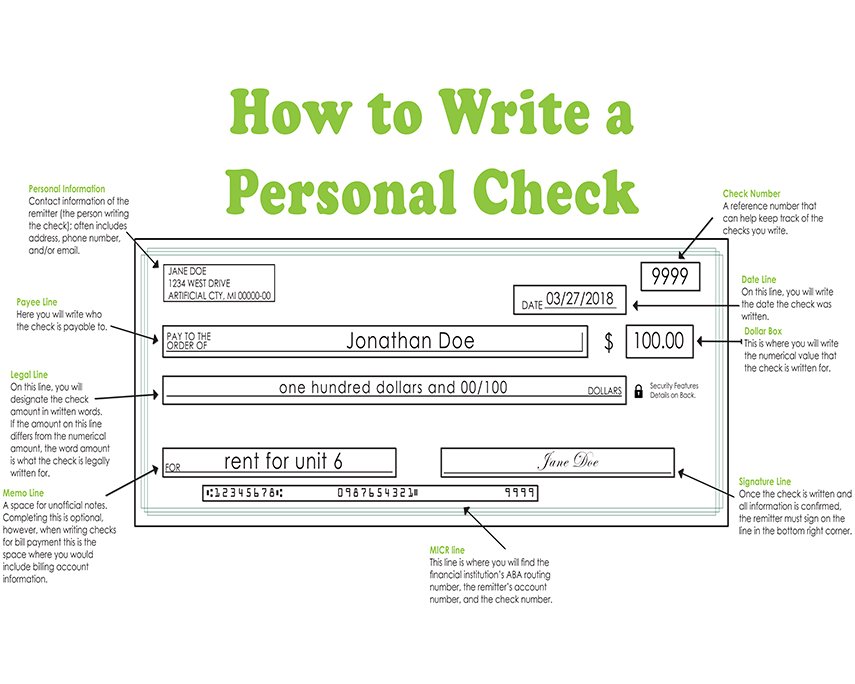
Step 1: Date the Check
The date should be filled in on the top right corner of the check. This date is the date you're signing the check, not the date of the payment. Write the date in the format MM/DD/YYYY. The payee's name should be written on the line below the date. Make sure to spell the payee's name correctly and use their full name, if possible.Step 3: Write the Amount
The amount of the payment should be written on the line below the payee's name. This should include both the dollar amount and the cents (e.g. $100.00). Be sure to use the correct decimal point and zero values.Step 4: Add a Memo (Optional)


 Format (Example Plus Formatting Tips)")


 - wikiHow")
")


:max_bytes(150000):strip_icc()/dotdash_INV_final_How_to_Write_a_Check_in_5_Easy_Steps_Jan_2021-012-47ca19a12a974145868e78c733109439.jpg "PMP/I-STOP - Prescription Monitoring Program- Internet System for ...")


