Network Basics Router Configuration: A Step-by-Step Guide
-
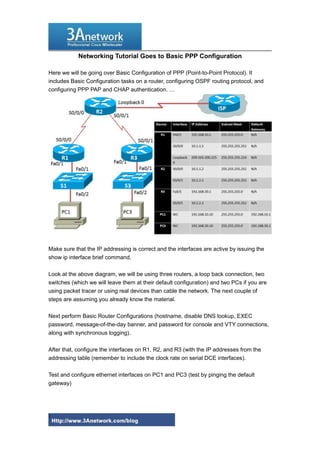
Understanding the Basics of Router Configuration In this article, we will guide you through the network basics router configuration so you can get a secure and fast home network. Each router is slightly different, but the basics are pretty much the same.
Step 1: Explaining the Router Ports
The first step in setting up your router is to understand the ports. Your ISP (Internet Service Provider) supplied you with either a modem or a router. The modem connects to the internet, and the router connects to your devices. There are several types of ports on a router, including Ethernet ports, USB ports, and WAN ports.
Step 2: Choosing the Best Location for Your Router
The location of your router is crucial in determining the speed and range of your network. It's essential to place your router in a central location, away from obstacles, and on a high surface. This will ensure that your devices receive a strong and stable signal.
Step 3: Testing Connections
Once you have set up your router, it's essential to test your connections to ensure that everything is working properly. You can test your connections by using a network cable to connect your device to the router and verify that you can access the internet.
Step 4: Securing Your Router with a Strong Password

Such details provide a deeper understanding and appreciation for Network Basics Router Configuration.
Securing your router is crucial in protecting your network from hackers and unauthorized access. You can secure your router by setting up a strong password, using WPA3 encryption, and enabling MAC address filtering.
Configuring Your Router: A Step-by-Step Guide
Here's a step-by-step guide to configuring your router:
Step 4.1: Accessing the Router Web Interface
To access the router web interface, you need to use a web browser and enter the router's IP address. The most common IP address for routers is 192.168.0.1 or 192.168.1.1.
Step 4.2: Configuring the Router IP Address
The first step in configuring your router is to set up the IP address. You can do this by accessing the router's web interface and looking for the "Settings" or "Advanced" tab. From there, you can set up the IP address, subnet mask, and default gateway.
Step 4.3: Setting Up the Wi-Fi Network Name and Password
You need to set up the Wi-Fi network name (SSID) and password to secure your network. You can do this by accessing the router's web interface and looking for the "Wireless Settings" or "Wi-Fi Settings" tab.
Step 4.4: Configuring the Router's Security Settings
You need to configure the router's security settings to protect your network from hackers and unauthorized access. You can do this by setting up WPA3 encryption, enabling MAC address filtering, and setting up a firewall.
Step 4.5: Saving the Router Configuration
Once you have completed the above steps, you need to save the router configuration. You can do this by clicking on the "Save" or "Apply" button on the router's web interface.
")

 - HP")


 - LazyAdmin")


/wireless-router-57ee8cea5f9b586c353f3e9f.jpg "Getting Started with GNS3 | GNS3 Documentation")


 - GeeksforGeeks")


