How to Set up Suffixes and Drop-Downs for MinifierD
When it comes to creating forms and user interfaces, drop-downs and prefixes/suffixes are essential elements that enhance user experience. In this article, we'll explore how to set up suffixes and drop-downs for MinifierD, a powerful tool for creating and managing digital content. We'll cover the basics of drop-downs, prefixes, and suffixes, and provide step-by-step instructions on how to implement them in MinifierD.
What are Drop-Downs?
Drop-downs are menus that can be expanded or collapsed, displaying a list of options to the user. They are commonly used in forms, menus, and other interactive elements to help users make choices and provide input. In MinifierD, drop-downs can be used to create a variety of interactive elements, including prefixes and suffixes.
What are Prefixes and Suffixes?
Prefixes and suffixes are word parts that are added to the beginning or end of a word, respectively. They can change the meaning of a word and provide additional context or structure. In MinifierD, prefixes and suffixes can be used to create custom labels, formatting, and other visual elements for your content.
Setting Up Suffixes in MinifierD
To set up suffixes in MinifierD, follow these steps:
- Go to the MinifierD settings panel and navigate to the "Suffixes" section.
- Click on the "+" button to add a new suffix.
- Enter the suffix text and any additional attributes or formatting options as needed.
- Click "Save" to save the new suffix.
Once you've set up your suffixes, you can use them in your MinifierD content by adding the suffix to the end of a word or phrase. For example, if you've created a suffix called "Jr.", you can add it to a person's name like this: "John Smith Jr."
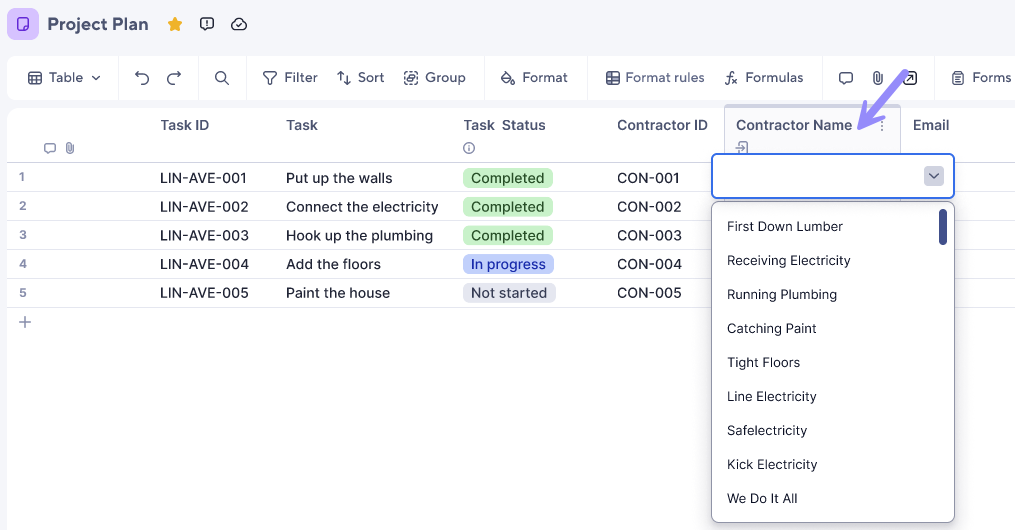
Setting Up Drop-Downs in MinifierD

This particular example perfectly highlights why How To Set Up Suffixes And Dropdowns For Minifierd is so captivating.
To set up drop-downs in MinifierD, follow these steps:
- Go to the MinifierD settings panel and navigate to the "Drop-Downs" section.
- Click on the "+" button to add a new drop-down.
- Enter the drop-down title and any additional attributes or formatting options as needed.
- Click "Save" to save the new drop-down.
Once you've set up your drop-downs, you can use them in your MinifierD content by adding the drop-down to a form or menu. For example, if you've created a drop-down called "Country", you can add it to a form like this:
Integrating Suffixes and Drop-Downs in MinifierD
Once you've set up your suffixes and drop-downs in MinifierD, you can integrate them into your content using a variety of methods. For example, you can use the suffixes and drop-downs to create custom labels, formatting, and other visual elements for your content. You can also use the suffixes and drop-downs to create interactive elements like menus and forms.
This particular example perfectly highlights why How To Set Up Suffixes And Dropdowns For Minifierd is so captivating.
Conclusion
References
For more information on setting up suffixes and drop-downs in MinifierD, please see the following resources:
- MinifierD Documentation: Setting Up Suffixes and Drop-Downs
- MinifierD Tutorials: Creating Interactive Elements with Suffixes and Drop-Downs
- MinifierD Community Forum: Discussing Suffixes and Drop-Downs in MinifierD
By following the steps outlined in this article and exploring the resources listed above, you can unlock the full potential of MinifierD and create stunning digital content that engages and inspires your audience.


 - ExcelDemy")


